

memoQ is a computer-assisted translation (CAT) platform designed for translators and localization teams. It supports translation workflows through its Windows desktop application and web-based tools.
The memoQ Add-on for Gridly facilitates the exchange of content back and forth between Gridly and memoQ, replacing the need to manually export and import files with translations.
Setup
Install and create your first connection
To install the memoQ add-on:
- From Homepage, open the CMS module.
- Click
 in the top right corner.
 - Select memoQ from the add-on list and click Install.

Once installed, follow the instructions in the add-on settings:
- If you are using memoQ cloud:
- Go to memoQ cloud. In the settings panel, select IP filtering for the Web Service API.
- Add IP address 18.192.141.172 to allow Gridly to connect to the Web Service API. It could take several minutes until this change takes effect.
- Copy the WEB SERVICE API ACCESS POINT and paste it into the box.
- Open the memoQ desktop application and select Server Administrator.
- Click
 to connect the memoQ server, under Category, select Web Service Interface.
 - Select Enable API Key, copy the key and paste it into the box.
- Click Connect to connect to your memoQ account.
- If you are using memoQ server:
- Follow this guide to enable Web service API: https://docs.memoq.com/current/en/memoQ-server-deployment-tool/deptool-configure-server.html
- Copy the base address and append the suffix “/memoqservices/” to obtain a Web Service API access point. For example, if your base address is https://abc.com, then your Web Service API access point is https://abc.com/memoqservices/
- Paste the Web Service API access point into the corresponding box.
- Copy the API key and paste into the corresponding box.

Add new memoQ connections
You can connect Gridly to different memoQ accounts. To add a new memoQ connection:
- From Home page, select Integration settings from the left-hand side menu
- Switch to memoQ tab.
- Click New connection.
- Enter Connection name and Description.
- Click Create.
- Click on your newly created memoQ connection to configure it similarly to your first connection.

Configure connection settings
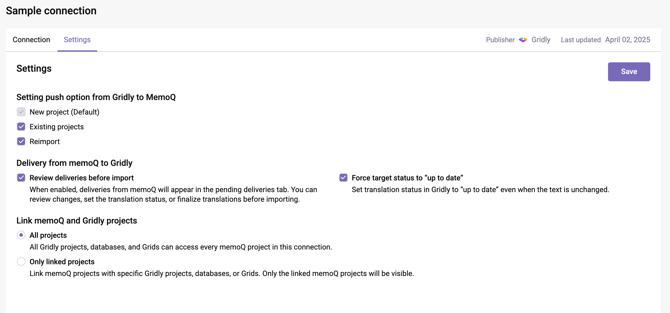
After creating a memoQ connection, click on it to open the connection details. Go to the Settings tab to configure the following:
Setting push option from Gridly to memoQ
Select how content is pushed from Gridly to memoQ:
- New project (default): A new memoQ project is created each time you push.
- Existing projects: Push content to an existing memoQ project.
- Reimport: Reimport content into an existing memoQ document.
For connections managed by an external vendor, this section is read-only. The vendor controls which push options are available to you.
Delivery from memoQ to Gridly
- Review deliveries before import: When enabled, deliveries from memoQ appear in the pending deliveries tab. You can review changes, set the translation status, or finalize translations before importing.
- Force target status to "up to date": Set source status in Gridly to "up to date" even when the text is unchanged.
Link memoQ and Gridly projects
- All projects: All Gridly projects, databases, and Grids can access every memoQ project in this connection.
- Only linked projects: Link memoQ projects with specific Gridly projects, databases, or Grids. Only the linked memoQ projects will be visible.
Pushing to memoQ from the CMS module
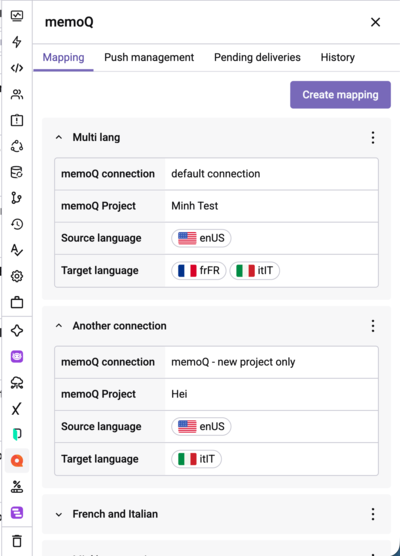
In the CMS module, the memoQ add-on pushes content from the active View of your Grid to memoQ, where translation files are created for your selected language pairs. Once the add-on is installed, click the memoQ icon in the right-side panel of a Grid to open it.
The add-on panel has four tabs:
- Mapping: save your push setup so you can reuse it.
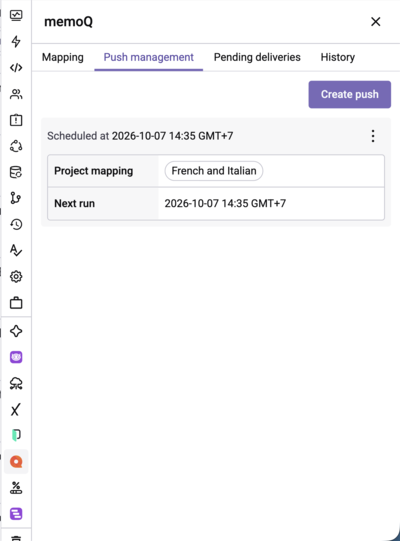
- Push management: push content now or schedule pushes.
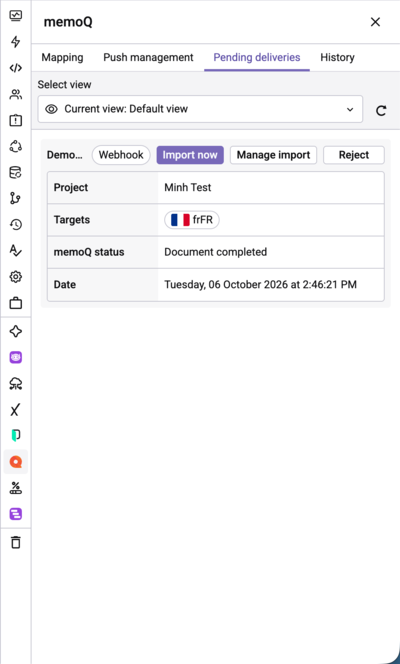
- Pending deliveries: review translations delivered from memoQ before they are imported.
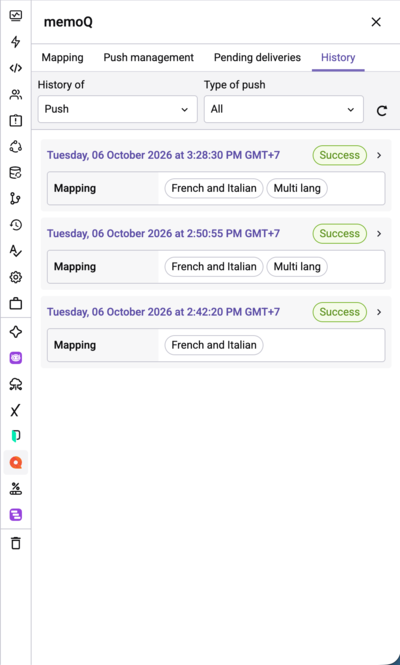
- History: see past pushes and deliveries.
Create a mapping
A mapping saves your push setup, including the memoQ connection, project, languages, and options, so you do not have to enter it again for every push. You can create as many mappings as you need, for example one per language group or per memoQ project.
- Open the memoQ add-on and go to the Mapping tab.
- Click Create mapping.
- Enter a Mapping name.
- Under Select push type and location, choose a memoQ connection, then select a push type:
- New project: create a new project in memoQ. Select a memoQ template and enter a project name.
- Existing project: push content to an existing memoQ project.
- Reimport: reimport content into an existing memoQ document.
- Enter a file name. Content pushed from Gridly is stored in a file with this name in memoQ.
- Under Select Gridly source language, choose the source language. Select Segment source data if you want Gridly to split the data into segments based on the segmentation rules in memoQ.
- Under Select Gridly target language, choose one or more target languages. Select the source language first. Only target languages that have a dependency set with the selected source language are available.
- Under Other options, configure the following:
- Does your project template have an import filter? Choose No, create the new one if your memoQ project does not have an import filter. Choose Yes, use my filter if it does. Gridly sends translation files in CSV format with commas as separators, so make sure your filter is configured accordingly.
- Select target dependency to import: choose which records to push based on their dependency status: Out-of-date, Up-to-date, and Unset. By default, Out-of-date and Unset records are pushed.
- Set up other columns (optional): select columns to be used as memoQ fields: Context key, Maximum length, and Comment column.
- Under Filter, choose Use current quick filter and quick sort, or select Customize your filters to set filters for this mapping.
- Click Save. To save and push in one step, click the arrow next to Save and select Push and save.
Note:
- Source and target languages must be part of the active View.
- Columns must be of localization data type, and Dependencies need to be set between the columns.
Push content to memoQ
Once you have a mapping, you can push content to memoQ right away.
- Open the memoQ add-on and go to the Push management tab.
- Click Create push.
- Select a memoQ connection.
- Under Select memoQ mappings, choose one or more mappings. Each mapping appears as a card showing its memoQ project, source language, and target languages.
- (Optional) Enter a File name for each mapping. If you leave it blank, the default file name is used. To remove a mapping from this push, click the trash icon on its card.
- Click Push.
Refresh the project page in memoQ. Your content will appear under the Translations tab.
Schedule a push
You can also schedule a push to run later or on a repeating schedule.
- In the Create push window, select your connection and mappings.
- Turn on Select date and time.
- Set the Date, Time, and Timezone.
- Under Repeat, choose Do not repeat to run the push once, or choose one or more days of the week, from Every Monday to Every Sunday.
- Check the Next run preview, then click Schedule push.
Scheduled pushes appear in the Push management tab, showing the mapping used and the next run time.
Deliver translations from memoQ to Gridly CMS
Once content is pushed to memoQ, the add-on creates translation documents with language pairs in memoQ. When a translation document is set to Delivered, it triggers the delivery of the content back to Gridly.
If Review deliveries before import is enabled in your connection settings, deliveries appear in the Pending deliveries tab. Otherwise, the content is updated in your Grid automatically.
Review pending deliveries
- Open the memoQ add-on and go to the Pending deliveries tab.
- Use Select view to show deliveries for the current View or for all Views. Click the refresh icon to check for new deliveries.
- Each delivery shows its project, target languages, memoQ status, and date. Choose an action:
- Import now: import the delivered translations into your Grid.
- Manage import: review changes, set the translation status, or finalize translations before importing.
- Reject: discard the delivery.
How Dependencies are updated by the add-on
If out-of-date or unset records are updated with new translations from memoQ, their dependency status is automatically changed to up-to-date.
The status of records that are out-of-date or unset and were not changed by translators in memoQ stays the same, even when content is pushed back from memoQ to Gridly. This is because no change was made in memoQ.
View push and delivery history
Use the History tab to track what has been pushed to memoQ and what has been delivered back.
- Open the memoQ add-on and go to the History tab.
- Under History of, choose Push or Delivery.
- Use the Type of push or Type of delivery filter to narrow the list, and click the refresh icon to update it.
- Push history lists each push by date and time, with its status and the mapping or mappings used. Click an entry to see more details.
- Delivery history lists each delivery with its project, target language, time, and who imported it and when.
Pushing to memoQ from the TMS module
Configure Category settings
In the TMS module, you can use memoQ to work on Tasks if Category type is memoQ integration. Before pushing your Tasks, you must first select a memoQ connection and a default memoQ project for you Category:
- Click
 next to Category name and select Settings.
- Select memoQ.
- Configure these settings:
- memoQ connection: Select a memoQ connection to use.
- Default memoQ project to push: Select a memoQ project to push Tasks under this Category to.
- Does your project template have an import filter?: If your memoQ project does not have an import filter, choose “No, create a new one for me”. Otherwise, choose “Yes, use my filter”.
- Click Save.

Push TMS Tasks to memoQ
To push TMS Tasks to memoQ:
- Click
 and select Push configuration. Configure these settings:
- General info
- Filename: If left blank, original filename will be used.
- memoQ project (set in Category settings).
- Source language: Select source language to push to memoQ.
- Target languages: Select target languages to push to memoQ.
- Push also Up-to-date records: By default, Out-of-date and Unset records are pushed to memoQ. Select this checkbox to also push Up-to-date records.
- Import filter for memoQ (set in Category settings).
- General info
-
- Select columns for Context key, Comment column, and Maximum length. This is optional.
- Click Save configuration.

- Click Push to memoQ.
- Refresh the project page in memoQ, your Tasks will appear under Translations tab.

Deliver translations from memoQ to Gridly TMS
When you have finished the translation in memoQ and delivered the file, translated content will be delivered straight to the corresponding Gridly TMS Task.
Click on Task's name to review delivered content from memoQ. Note that this file is read-only and cannot be edited.
