
Table of contents:
- Open the CAT Editor
- CAT Editor Overview
- Working with segments
- Leverage localization resources
- Keyboard shortcuts
To translate content, you can use our CAT (Computer-Assisted Translation) tool. Gridly CAT is a module designed to help you translate more efficiently while ensuring high quality.
In this guide, we'll introduce the CAT Editor—a comprehensive set of tools in a single interface to help you achieve high-quality translations effectively.
Open the CAT Editor
In the TMS module: If your team uses both the TMS and CAT modules, simply open the tasks in My Tasks to start translating in the CAT Editor.

CAT Editor Overview
- Toolbar with editing commands, search functions and access to localization resources.

- Editing area displays the source and target texts, with filter and sorting options. The columns on the right show the translation source (Translation Memory with match percentages, Machine Translation), repeated sections, AutoQA statuses, and the segment confirmation box.

- A sidebar to assist with translation, including: the CAT pane, AI-assisted translation, concordance search, segment comments, and record data.

- Additional tabs for segment history and QA checks.

Working with segments
Confirm segment
All translated segments need to be confirmed before completing a job. Confirming a segment saves the translation in the translation memory and generates a snapshot in Job report.
There are multiple ways to confirm segments:
- Use keyboard shortcut
Ctrl+Enter(Windows/Linux) orCmd+Return(MacOS). - Click on the checkbox at the end of your segment.
Confirmed segment will have this ![]() checkbox.
checkbox.

If you need to edit confirmed translations, remember to confirm segments again to reflect changes in your translation memory.
To confirm all segments at once, go to Work control → Confirm segments.

Work control
The Work control menu provides three actions:
- Confirm segments: Bulk confirms all segments
- Transfer to next step: Moves confirmed segments to the next TMS workflow step
- Submit work: Completes current TMS workflow step. All segments must be confirmed before submitting. Once submitted, the segments become read-only.
To perform the Transfer to next step or Submit work actions, all segments must be free of QA check errors. If there are QA errors present, you need the Bypass QA errors to submit work permission to proceed. For details, see: Permission overview.

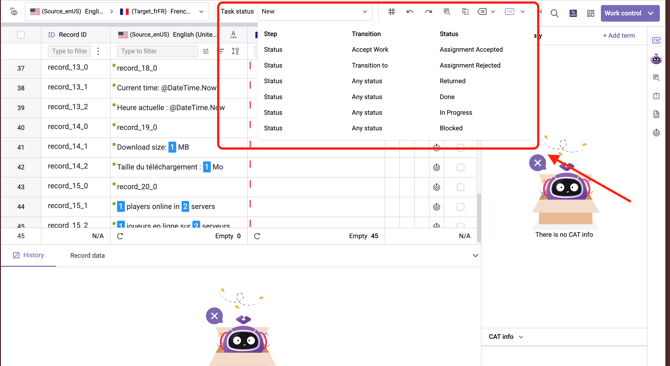
If you're working with TMS tasks in the CAT editor, you can change the task status directly without leaving the editor. This allows you to update your workflow status as you progress through translation tasks.
To change the task status:
- Click the Task status dropdown in the top toolbar.
- Select the transition you want to apply. The task status will update immediately.
Tags
Tags are non-translatable text which can be used to represent variables, special formatting, formal names, code, etc. Tags are used to maintain the formatting or internal code (like index entries or cross-references) of the original document, so translators won’t translate them by mistake.
- Click
 in the upper toolbar of the Grid.
 - Click the toggle to Enable Tag detection.
- Choose how you want to detect Tags by selecting the appropriate option.
Tags are hidden in the editor by default. To show them, click Expand Tags.

Spell check translations
Use the built-in spellcheck to detect and correct spelling mistakes in more than 30 languages.
Spellcheck is enabled in the Translation workbench by default. You can click ![]() in the upper toolbar to turn off/on.
in the upper toolbar to turn off/on.
To use spellcheck:
- Open a cell, enter your translation.
- If a spelling or grammar error is found, it will be underlined.
- Click on the suggested words to accept the suggestion and replace your current text.
For more details, refer to this article: Spelling and grammar check.

Special characters
Click![]() on the header to enable the detection of special characters, including white spaces, symbols, accent marks, or punctuation. Once activated, all of those will be highlighted in your Grid content.
on the header to enable the detection of special characters, including white spaces, symbols, accent marks, or punctuation. Once activated, all of those will be highlighted in your Grid content.

Repetitions
Enable Repetitions to reuse previous translations for repeated segments.
- Click
 on the header to enable repetitions.
 - Once the segment is verified, the translation will be automatically applied to all segments with the same source text.
- Click
 next to a segment to deactivate automatic propagation for this section.

Segment comment
- Open a cell, switch to the Segment comment tab
- Click
 to create a new ticket. You can add basic tickets or Linguistic Quality Assurance (LQA) tickets.
 - Once done, click Add.

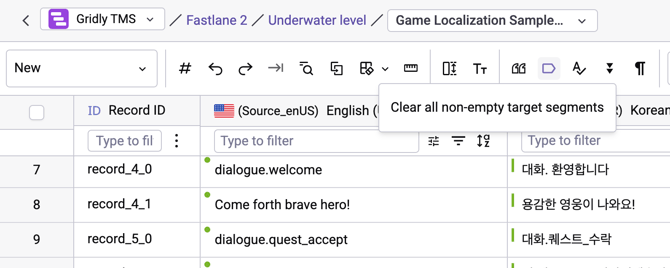
Bulk delete target texts
To bulk delete target text:
- Select the segments whose target texts you want to delete.
- Click the
 icon in the top toolbar, or use these shortcuts:
 Ctrl+D,Ctrl+Backspace(Windows/Linux);⌘+D,⌘+Delete(MacOS). - Review the number of target texts to be deleted and click Save in the confirmation popup.
To quickly delete all target texts, click![]() next to the
next to the ![]() icon and select Clear all non-empty target segments.
icon and select Clear all non-empty target segments.
Leverage localization resources
Pre-Translation wizard
You can pre-translate the file using the available localization resources such as Machine translation, Translation memory, Glossary.
- Click
 in the header, select Pre-translation Wizard.

- Refer to this article to configure settings: Pre-translation Wizard.
Translation memory (TM)
Use Translation Memory to insert translations to similar segments to increase your translation speed.
- Click on a target cell.
- Where there is an associated TM term, it will be shown in the Suggestions (TM - MT - Glossary) pane. The number
 indicates the TM matching score, based on the similarity of the source text to existing translations.
 - Double-click on the TM term to insert into the selected cell.
To find learn how TM matching score works in the CAT module, refer to this article: Translation Memory (TM)

Concordance search
Concordance search allows you to search for TM matches containing the word or phrase. This helps you gain insights into how words are used within specific contexts.
- Open Concordance search by clicking
 in the right-hand side toolbar or use the shortcut
 Ctrl+K(Windows, Linux) and⌘+K(MacOS) - Select from the dropdown how you want to search:
- Search by Record ID: Enter the Record ID then click Search.
- Search by Term: Choose if you want to search in Source language or Target language, then click Search.

The number ![]() indicates how closely a retrieved translation segment matches the searched term or phrase. Higher scores mean stronger relevance to the search query.
indicates how closely a retrieved translation segment matches the searched term or phrase. Higher scores mean stronger relevance to the search query.
Open Hints to learn how to use wildcards for searching. Wildcards (*, ?, and " ") allow for precise and flexible concordance searches, improving efficiency.
Tip
You can quickly use Concordance search on a term by highlighting it in a source or target cell and right-click.
Glossary
A glossary consists of terms. When a term in the source language is detected, it will automatically be highlighted and shown in the suggestion pop-up.
Make sure that you have assigned a Glossary to this Grid. For more details, refer to this article: Glossary.
- Open a target cell
- From the Suggestion tab, you'll see the list of glossary (TB) and MT terms.
- Click on the Glossary (TB) terms to insert into the text.

AI-assisted translation
- Open a cell.
- On the right-sidebar, click
 to open AI-assisted translation.
Use default prompts
- (Optional) Add context for more accurate translations.
- Click Translate with AI.
- Click on the translated text to insert it into your selected cell.
- To customize translation with AI suggestions, click on the suggestions: Rephrase, Shorten, Suggest variants, Correction, Sentiment Analysis. For further information, click here: AI-assisted translation.

Use custom prompt
For a complex request, you can use Custom prompts to customize your translation. This is only applicable if the selected cell already contains text.
- Switch to Custom Prompt in the AI-assisted translation tab.
- Enter your prompt, then click GO!
- Click on the translated results to insert to your selected cell.

Machine translation
- Click on a cell and open the CAT pane
 .
. - At the Machine translate section, select a machine translation engine (Google Text Translate, DeepL API, or Algebras).
- Click Translate.
- To apply the translation to the cell, click on the translation result.

Check context
You can find the context using all the available resources you added to Gridly.
- Record data: View information from other columns in the Grid (if available). You can find
 in the side toolbar.
 - Context note: View all the data you have in the Grid settings.

QA check
Gridly CAT editor is equipped with QA check (Auto QA) and AI check (powered by OpenAI). You can select one or both of these platforms to check segments of spelling errors, grammar errors, missing tags, etc.
Perform QA check
For the detailed guide, refer to this article: QA check.

Perform AI check
- Open the CAT editor.
- Click the
 button on the right-hand side toolbar to open QA check panel.
 - Click the
 button and make sure AI check is selected.
 - Click Run QA check

QA status in the CAT editor
Each segment in the CAT editor has an icon indicating its QA status:
- The QA icon is grey
 , QA check is not yet run or the result is outdated (e.g. changes in translation).
 - The QA icon is orange
 , this means one or multiple errors have been detected by QA check.
 - The QA icon is green
 , the segment has no errors.
Understand QA check result
When QA check has finished, results will be displayed in the QA check panel. You can also view QA result for a specific segment by clicking on its QA icon.
- Error number: Error number is associated with a segment. However, error number and segment number are not the same. Click on the error number to highlight the associated segment in the CAT editor.
- Error type
- Detail
- Platform: Auto QA or AI check
There are two cell colors:
- Yellow indicates a Warning that requires your attention.
- Red indicates a critical Error.

Keyboard shortcuts
Refer to this article: Keyboard shortcuts.